Saturday, March 31, 2012

New Garden Architecture

As I finished up last time, I talked about building a new garden structure, a small yurt.  Well, I did it.

I spent several days trying to figure out what to do about a platform.  Most yurts these days seem to get up up on platforms, which is kind of funny.  The original design is of course Mongolian, even though there are plenty of variations.  But it's designed to be a house for nomads, yet it gets set up on a platform.  The platform is heavy, not mobile, and removes the mobility of the structure.

So in the end, I got a shovel and roughly leveled the ground where I wanted this thing so it's not 6" taller on one side than the other, then I brought in two cartloads of wood chips and raked them level.  Then the chickens un-leveled them.

I had originally built this thing about five years ago as a small smithy for my hand-cranked forge.  My wife came on the scene soon after that, and ever so gently convinced me that the back yard was a poor place for it.  (She was right.  It wouldn't have looked good there at our wedding.)  So I took it apart and stored the pieces.  And a yesterday I hauled out those pieces, which were basically two stock panels, 16 rafters, and a door frame. 

I marked out my site before leveling it, so I had a circle the size I knew I'd end up with.  Last time, I used quick links to tie the two panels together, overlapping by one 8" interval between verticals.  This time I cut off the end vertical on opposite ends of the panels, then I used 9" sections of old copper pipe as sleeves.  I should have had 13 of them but I only cut 10.  Oh well.  It works.

I bent the other ends around and tied them together temporarily with some thick soft wire I picked up at the dump a while back.  Then I set up the rafters.  One of them split and broke, but I figured 15 would be good enough.  The upper ends are cut so that they're vertical when in position.  The lower end has two vertical sections, the upper one 1/2" out from the lower, so that that short horizontal can bear on the top of the stock panel.  Both ends have holes drilled a few inches from the ends.

I started by wiring the upper end together and spreading the bottoms to make sort of a tipi.  Then I lifted one bottom end at a time and wired the ends to the top horizontal of the stock panels.  With three up, it looked like a pile of rafters hanging vertically from a tripod.  One by one they went up, and then I had to reposition all of them, one by one, so that they'd be equally spaced.  The way they come together at the top still isn't quite right, but I'll live with it.  It's good enough.
  And then I used heavy fence staples to attach the door frame.

I wrapped the wall in a few strips of old greenhouse plastic, and covered the top with some old white plastic tarp. There are a few holes in both of these that I'll want to tape up, and I need to arrange doors, but overall, I'm happy with it.  It'll be a place to store tools, get out of the mist and wind for a break, work on my computer in a quiet place (I haven't tested to see if wifi reaches.) and maybe take a nap out of the sun in the summer.  I'm still considering a floor.  If I get around to it, I'll lay down more plastic on the ground and then have a few sheets of plywood over that, as a hard clean surface, good for sorting seed packets and such.
I've got some shutters in the barn.  Maybe a pair of them will work as double doors to keep the chickens out.

UPDATE:

Last night I did as threatened and found some shutters in the barn.  They're 47" x 14", which is just right for the 48" x 29" opening.  They had half hinges already, so I drove in some large finish nails and then bent them up to serve as hinge pins.


This shot shows the fold in the roof tarp.  I'll probably need to tape that down somehow.
Here's a detail shot of a rafter butt:
And here's my lantern, which meant that I had more light than if I was just working with my flashlight in my mouth last night:

Monday, March 26, 2012

First Post of Spring!

Last Wednesday it was up to 80° here.  This morning it's snowing.  It's just light flurries, but there it is.  I can't complain.  A late March or even early April snowstorm is to be expected as often as not around here.  The ice is gone from the ponds and you have to really hunt to find a little bit of snow that hasn't melted yet.  The Canada Geese are grazing in the field below the garden every evening.  Two nights ago I heard spring peepers and wood frogs.  Crocus are in full bloom and a few daffodils are open in front of the sun porch. The grass is starting to green up.


Of course in the garden, controlling the grass is one of my highest priorities.  Section 14 is pretty well under control.  I still need to root out some rhizomes on the downhill (east) side of it, but it looks good.  I planted more garlic and got a fence around the section.  The fence is none too soon, as the chickens were scratching a dust bath area in the first garlic bed, and I may have to re-plant a few there.
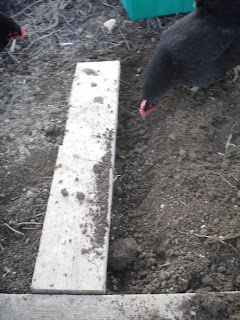
Toward the bottom of the picture there's a horizontal line of damp soil.  That's where I stopped planting garlic.  The last few feet are still open, although it seemed like a good spot to tuck in some short rows of lettuce.

I'm working with a general pattern of beds four feet on center, which should usually come out to 30 inch growing beds and 18 inch paths, but I crowd the paths a little.

I want lots of garlic, but I also want to have things mixed in so it's not just a solid block.  I planted the next bed space with two rows.  One is chard and one is curly kale.  These are both fairly cold tolerant.  It's supposed to go to the low 20's tomorrow and Wednesday mornings, but they aren't up yet so they should be fine.  It occurs to me that if I can round up enough scrap boards (half rotted is fine) to set on top of the rows, that will keep the frost out of the seedbed.  I've been watering them lightly on the warm days.  The national weather service says we're in a light, short term drought.

And then there's the third bed, which I planted to garlic again.  There's about 100 cloves that are well sprouted transplants from the section 7 bed where I grew garlic last year and didn't get quite all of it pulled out.  Their leaves are about 4" tall already, showing me how far behind the stuff I'm planting as less sprouted cloves is.  But it's an early spring, mostly, and there's time for it all to do well.

Here's the third bed in the center, just before planting all the garlic.  The poultry net fence is set up around the section, but not electrified.  On the right, I keep digging and pulling out rhizomes.


I think the fourth bed will be spinach, but I'm not there yet.

As I move through and watch the grass starting to sprout, I know I can't be too fixated on one spot.  I'm going to miss stuff, and it'll have to be dealt with again later.  The goal is to keep any one spot from getting too bad to deal with later. Were the grass is sprouting fastest, I go in with the digging fork and turn over the most advanced areas, shaking their dirt onto the green grass around them as a mulch.  Instead of being meticulous about working down a row, I look around like a grazing animal, cherry picking the most lush clump to go after next.

Sections 13 and 12 are going to be the hardest.  The grass and the rhizomes are thickest there.  I did some experimental digging and the spading fork isn't going to work.  It's too dense of mat.  Instead, I'm going to turn it all over with a square point spade, cutting the rhizomes into little bits, all of which will sprout.  Then I'll go through it repeatedly with other tools and slowly pull out the little bits.

Section 11 had corn hills in it last year, and was supposed to get squash and beans but that never happened before I hurt my back.  The corn had been planted on ridges, and this seems to have discouraged running rhizomes.  The soil needs more organic matter, but the weed problems are going to be from annuals that can be controlled with normal cultivation.

Section 4 looks promising.  There are some rhizomes, but there's a lot of organic material in there, including lots of year old wood chips and crab shell.  Digging is easy.  Using my hit and miss method of going after the most noticeable grass sprouts, I've turned a lot of it over somewhat. already.


I've recruited one other gardener, who's going to take on the west half of section 7.  That's about 1000 square feet.  That area had a lot of hay added a few years ago.  I paved most of the section and let it rot there, and then last year I had a lot planted there that the weeds took.  Again, with normal cultivation for weed control, it should do fine.

So, weed control and cultivation tools:

I've been using the spading fork a lot, and it works fairly well.  I notice it has a crack in the fiberglass handle, and I'll have to watch that.  New handles are something that I shouldn't need for most things if I'd only take care of them.
The handle of my square point spade was treated last year with "Boat Soup", which is a mix of melted parafin, turpentine, linseed oil, and pine tar.  It probably should get another coat, as should many of my tools.

I've mentioned the three tooth cultivator from Glasier.  It's due for the treatment.  The nice thing about that handle is it's just a conical point, and if it breaks, I can make a replacement easily enough.

My largest hand cultivation tool is my broadfork, which I got from the dump.  Amazing what you can get there.  I've put it to heavy use and there are a few repairs visible if you look closely.  I think the reason it was at the dump was that the tines bolt on with one bolt each, and they turned too easily.  I welded them so they don't turn.  I've also broken one of them off and welded it back on with a reinforcement, and I've nearly ripped the whole thing in half and welded the cross bar back together.

And then there are the wheel hoes.  I've got one that's an old Planet Jr., and I have multiple attachments for it, but it doesn't get much use.  It needs the handles replaced and some things tightened up.  It seemed like a good idea at the time, but now it seems like most of the tools aren't very well suited to my soil.  They tend to get caked with mud and fine roots and then they don't cut.

The wheel hoe I use is one I made myself out of old bike parts.  It's propped up at an awkward angle here, but you can see the geometry well enough.
The tool bits attach to a holder from an old commercially made wheel hoe.  I got that bit at a junk shop for $5.  It's bolted on to a bike handlebar gooseneck that's designed to clamp into the head tube with a wedge and bolt set up.  The idea was that I could pop that out and change tool heads easily that way, but instead I've been bolting and unbolting tines from the holder.  The holder can take five tines, and I can make tines from any small square stock.  The originals were 1/4", but the one that's in there now is extra long and made from 3/8" stock.  This is the first useful thing I've made on my little hand cranked blacksmith forge.  If the soil was loose it'd be about right, but because I've run into some heavier clumps with grass root balls, I bent the tine.  I was able to bend it back without heat, and then I added the wire as a reinforcement.

The original tines were almost vertical in the soil.  I intend to forge a set that will run horizontally in the soil the way the ones on the three tine hand cultivator does, not too deep.  The stock for these will have to be much longer than the originals to work right.  I actually tried using hose clamps and attached the three tine cultivator to this wheel hoe.  That worked well.  Of course bike parts are cheap and I may just build a variety pack with different tools on each one.  Because of the welding, it's impossible to change  a tire once the thing is put together.  The tire on this one is actually flat, but it doesn't seem to matter much.

The last thing I have to talk about is how I want a new garden building.  Call it Nominative Determinism.  My last name actually means "small house".  For the last several days I've had the Eze-Up market canopy set up low in the garden, and I've got a low table/cart and a folding chair there.  I've had to take it down today because of the forecast wind.  What I want is something durable that I don't have to take down.  Several years ago I had a small yurt set up, made from two 16' stock panels.  I still have the parts.  I just need a level platform to set it up on.  It would be just inside the gate, 11' diameter, and give me a place to get out of occasional showers, as well as a place to stretch, keep a few tools, a water jug.  And it'd have to have a door to keep out bugs and chickens.  The trick is finding the time, between the garden work I need to do and my day job.


Monday, March 12, 2012

Finally, Some Garlic in the Ground.

So a while back I overhauled my garlic, which was poorly stored, and put the stuff that seemed to be holding well into an improvised root cellar and put the stuff that had started sprouting into a cold frame.  The stuff in the cold frame hasn't all sprouted, but a lot of it has.
I think I could transplant a lot of this at this stage, but where?  It's so far along that I think it could get cold damaged easily unless it went into a larger cold frame.  So I'll ignore it for now and concentrate on the stuff that's been in the pit.

I pulled the blue bucket out.  That's the stuff that got tipped over when the pit flooded.  A lot of it looks like this:
Healthy white roots and an inch or two of top growth.  Since I'm planting them a few inches down, the whole thing gets buried.

I got my bed prep done the other day.  This bed is 40' long.  The board in the foreground is my planting pattern board.  It's a 2x6 that has a notch every 6" on each side, but the notches are offset so it will make a regular triangular pattern.  The boards on the left are temporary, there to guide me.  When I did this for last years crop, I didn't use that guide and things wove back and forth some.  Since I plan on several beds of this with even pathways, I'd better use the guide.
As I got ready to plant, I did have one concern:  Chickens.  I'm going to have to work up more area in an even more irresistible manner, and maybe put some kind of cover over the bed as it sprouts.
So here's how I plant.  I use the board as a guide and use a small hand tool called a ho-mi, also known as a Korean hand plow.
I dig a trench along the side of the board...
... put in the sprouting garlic cloves...

... roll the board over, which should advance it 7"...
... and use the ho-mi to dig a new trench along the side of the board, burying the previous cloves in the process. 
I try to rake both away from me and toward me with the ho-mi to cover the cloves evenly.  When digging for a row that starts 3" from the near end of the board, I try to dig my trench a little long, so that the final clove goes in 3" beyond the far end.  That means 6 cloves per trench.  That should give me about 400 cloves (eventual heads) in my 40' bed .  I intend to put in three or four of these beds.

The chickens enjoy this greatly.  I occasionally have to move one out of the trench or push them off after they peck at my wedding ring or something.

This spacing worked well last year, but was there over the winter with a heavy hay mulch on it.  This makes me think grabbing some of that ancient hay from the barn might not be a bad idea at this stage.  I wonder if that will make the chickens even more likely to scratch at it though.

Otherwise, I have to add that it was an amazing day, weather-wise.  The historic average high for March 12th is 37°F, with a low of 19°.  The previous record high was 52°.   We had a high today of 61°, and our forecast low is 37° for tonight.  I can here Canada Geese squabbling back in the swamp, establishing their nests.  The ice on the long pond at the bottom of the field has large holes in it where the pickerel weed remains gathered just enough more heat from the sun to melt those spots first.  I need to remember that this is not normal, and that anything I plant out due to irrational exuberance will need protection at times, because we will most likely have a few more cold nights, maybe as low as 20°.  Still, I wonder when the spring peepers will come out.

Sunday, March 11, 2012

Rats, Plan A revisited.


Plan A for rat control is a metal barrier all the way around the greenhouse, deep enough so they won't dig under it, and tall enough to discourage them from climbing to the top and chewing throught the plastic.  I got this task done on three sides several years ago, but never got that last side done.  Tonight, it's done.
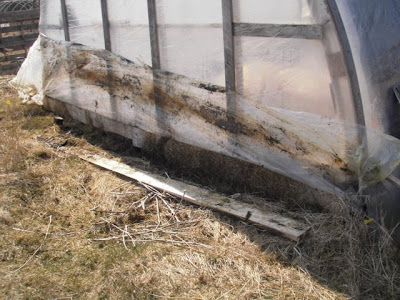
I lifted up the plastic on the east side and stapled it temporarily to keep it out of my way.  The board on the ground was holding the plastic down, but clearly not keeping things out.
In the center of the wall, where two baseboards meet, there was a clear hole where they'd been going in and out.  To the right of that was more area that they could get through easily.  And at each corner there was a spot where they'd obviously been moving through.
I dug along with a square point spade.  It was easy enough until I got to the last three feet.  There, the soil was frozen.  So I got the mattock.
That seemed to be working fine, until my poor care of it came back to bite me and the handle split.
Luckily, we seem to stock hockey tape.  Pink seemed like a good color for something I didn't want to keep leaving out.  I don't know how long it will last, but I noticed later that I have a spare handle in the shop.  So, back to digging.
Here you see the northeast corner, not quite fully excavated.  The rats went in and out to the left of the foundation post.  To the right of it you can see the 1" blue foam, the greenhouse plastic coming down outside of that, the sheet metal outside of that, and then the corrugated drain line, which, if connected to a ditch that isn't filled in, will drain water away from the north side.
In the trench I noticed this hole going into the soil under the greenhouse.  I should do some cleaning and cultivating inside.
Here's the ditch all dug out.  It's about 14" below the bottom of the bottom board.
16" tall, 8' long, 1" thick blue expanded polystyrene placed in the ditch.  I had to add a scrap of 2" at the north end.  Apparently, where the foam is, the greenhouse is just a little over 16' wide.
Then I tuck the plastic down over the foam as neatly as I can.
This is old metal roofing from a mobile home that I got off the metal pile at the dump several years ago.  It's beat up, but it's galvanized and 30" wide.  They're not quite 10' long, which is plenty to cover the foam.
And here they are fit into the trench.  I bent the ends over slightly to make rat proof corners.  You can also see that before I backfilled, I took a length of that drain line and put it in the bottom of the ditch.  The circle of the opening is down there at the corner.  I should probably cover that with hardware cloth, and backfill the whole area with loose stone.

I looked around and found the southwest corner is a little loose too.  I'll need to move some debris out of the way, dig it out, and put a folded 90° piece of metal around the corner, but for the moment, I've got a handleless shovel blade in front of the hole, so the whole thing should be tight now.  Next I need to clean out inside and make sure there aren't any still hiding in there.

First Outside Bed Prep.

Since I last posted pictures of the garden, we've had a run of seasonal weather.  We had a snow storm a week and a half ago that left us 7".  That hung on for a couple days.  I can't complain, because hey, it's winter.  What do I expect?  Well, I expect an early spring. 

But these last few days it's thawed out some.  The area where I'd spread plastic over section 14 is thawed.  Yesterday I did some more digging in that area, and I now have space for three 40' rows, each 3' wide, all more or less weeded out of witch grass.  I'm sure there will still be some sprouts of it, but they should be small enough that I can pull them without dislodging all the garlic I'm about to plant.

On the northeast corner of this dug area I could do a little more to make it a rectangle.  The swath got wider as I worked downhill.  And on the southwest corner there's a spot where the plastic was held down by that low wheeled weeding platform with all the poultrynet piled up on it and it didn't thaw as well.  I could go deeper there to.  But overall, I'm happy to have this much ready.

I tried two methods to do all this digging.  The first was to go along across the swath, 10' wide, with a spading fork.  I'd loosen a fork full, smash it as I moved it a few feet, and then bend down and pick out the rhizomes.  This was a lot of bending.  I got about half of the area done that way, little by little, with plenty of encouragement from the chickens.  (Worms are apparently delicious.) 

The second method was to use my Glaser 3-tine cultivator.  This is a great tool.  Most 3-tine cultivators are about the size of your hand, and work about as well.  This one is about 8" wide, which means that there's plenty of room for soil to pass between the tines.  It's not a rake.  But rhizomes are long and it will catch them and pull them to the surface.  The downside is that at $40, it cost me significantly more than almost any other non-motorized garden tool I've ever had.  It gave me some worry when it disappeared last year too.  I found it hiding along with some debris stacked near the fence on the north end of section 4 a few weeks ago.  The handle is a bit dry-rotted now because of that.  But the handle is more or less a heavy broom handle with a conical end.  I can make one out of some convenient scrap easily enough.

Technique with the 3-tine cultivator was to work across the swath in about 2' strokes, digging down as far as the tines will reach, and in the process, moving the soil a little.  I know I said it isn't a rake, but in scratching around, I did rake the soil down a bit, and raked it up onto soil that had already been done, so I effectively tilled down about 10" this way.  I did this in a wide footed stance, bent low, pulling diagonally toward me.  This may not sound ergonomic, but because I stayed bent over, I think it was better than the constant up and down I was getting with the fork.  And the chickens still approved.

As I got to the lower end, toward the raspberries, I found I was pulling out not just rhizomes, but baseball sized rocks.  These have never been noticeable before, which means I must be digging slightly deeper than in the past.  When I first started in this garden ten years ago, there was a very clear transition between the brown, oxygenated surface soil, and the grey, anoxic, dense clay that lay underneath.  I'm not seeing that boundary now.  Section 14, being just inside the gate, is one of the best amended areas of the garden.  I can only hope to get the rest this well done, although sections 4, 7, 10, and 11 aren't so bad either.  12 and 13 should probably be my focus for improvement at this point, but I digress.


After I finished the final part of my swath in section 14, I walked around with the spading fork and did some experimental digging.  In most places, I could dig down about 4" and then hit a frost layer.  The current forecast is for well above normal seasonal temperatures.  The long range graph shows two nights in the next two weeks where the temperature drops below freezing.  This is absurd, but I'll go with it.  We will be thawed in no time.

Unharvested onions from last year in section 7 are sprouting, and I'd like to try to get a seed crop from them to start next years onions with this fall.  Last year I hunted around to all of the likely suspects and finally found onion sets at Feed & Seed about a month after I felt like it was a good idea to get them planted.  Four Season Farm across town does fall planting and overwinters them under cover, resulting in a very early harvest.  That'd be nice.

I also need to wear gloves for some of this kind of work.  I didn't notice the blister at the base of my left middle finger yesterday until it was torn off.  This morning I dosed it with St.John's Wort Oil and it feels okay, but I'd rather be building callouses.

I took the acetaminophen/ibuprofen mix last night, and I feel surprisingly good this morning.  I'd better do my core strength exercises now though.


Rats

I've been having rat issues in the greenhouse.  I've known that there's been something in there for a while, but I'd really hoped that wishful thinking would take care of it.  Sadly, it hasn't.

All of the little sprouts of lettuce, kale, and arugula are gone.  They don't seem to like cilantro, except how it feels between their toes.  The potatoes from the barrel are taking a beating.  There are holes dug under all the back corners of the cold frames.

To quote Bugs Bunny, you realize this means war.

I'd really rather not use poisons.  The worry is that poisons will be passed through the food chain to other wildlife when they find a dead rat and eat it.  So I tried other options first.  I looked around on line for information on making snares for them.  One English site said to make them out of some kind of braided wire usually used for fishing leaders, so I went to my local hunting and fishing store and asked if they had that sort of thing.  The salesman told me it was the wrong time of year, and that I might be just as well off using wreath wire and I should see if the hardware store had any.  The hardware store said no, and sent me to the craft supply shop right next to the hunting and fishing place.  I ended up getting a 4 ounce roll of 26 ga. steel wire, painted green.

For my readers not from around here:  Downeast Maine makes a lot of Christmas wreaths in the fall, which are shipped all over the country.  This is a cottage industry, and there are wholesalers who buy wreathes and ship them.  Because of this, wreath wire, which is thin florist wire, is fairly easy to come by.

So I brought this home and looked again at the diagrams for making a snare.  The loop itself is straight forward enough, but he triggers are tricky.  The idea is to have a bent whip that, when the rat jiggles the trigger, will snap the noose back and hoist the rat into the air by it.  I tried several options for triggers, including nails barely wedged into cracks in the greenhouse sill, and slats that were notched into thin stakes in the ground.  Once I got into the task, I just started making loops and putting them in runs without a trigger.  They didn't seem like they'd be very reliable but wire is cheap and setting them up is easy.

I haven't caught a single rat.

I'm going to go back to plan A, which is to try to deny any path of entry.  The ground is thawing fast and I have the metal to finish the barrier around the east side where they're coming in.  I'm also going to proceed to plan C, which is to use the poisons, and limit the exposure of other wildlife by trying to deny the rats access. 

I'm also putting some in covered locations near the hen house.  I'm seeing a lot of traffic along the fence, and occasionally seeing one actually in the hen house.  I've had snap traps set in a trap box all winter and haven't caught anything that way.