Saturday, February 25, 2012

Snow that doesn't last

When we woke up this morning there was the better part of an inch of slushy snow on the ground.  Now it's almost noon and the ground is clear.  This morning at around 10:00, I went out and took a few pictures and walked around.
 Checking into the greenhouse I noticed a few things.  First, it's flooded again.  Most of the ground is fine, but in a few places you can see how high the water is up.  For instance, the garlic buckets are floating in their pit.
This is no big deal really.  The blue bucket will be on its side when it settles, but they're all floating rather than filled with water.  There are a few heads in the water, floating, but I can't imagine how this might hurt them.
The empty potato barrel is floating a few inches out of it's hole.  I think I'm done with it and I should pull it out soon anyway.   In warmer weather I'll probably use it as a watering cistern.  Meanwhile, the potatoes aren't looking that great.  Between being flooded and (worse) being left with too little protection when it got cold the night after I pulled them out of the barrel, the sprouts are dying back badly.  I do see new sprouts starting to form though, so I think they'll still be okay as seed potatoes, as long as I treat them reasonably from here on out.


I saw one potato that had made its way into one of the cold frames and had a chunk out of it.  I have more than mice in there.  I think I need to install the cold frames with soil a few inches deep around them.  You can see, just behind the potato, that there's a foundation cedar post holding up the back edge of the cold frame.  That makes it very easy for things to get in and out.

The reason that the greenhouse is flooding should have been obvious to me.  I had put a drain pipe along the north wall when I installed the foundation insulation back there, but sometime last summer I filled in the ditch that leads away with a few shovels of soil, because in the heat of the summer, I want to be able to water by flooding the place a little.  When I run the irrigation pump, I have four 1" lines running.  I just run a line and an emitter hose in there and let it get good and soaked.  But I didn't dig the ditch back out in the fall like I should have.
A little work with the mattock and it was flowing.  This is the northeast corner, and the ground I had to dig through was frozen, but I could still hack through it little by little, spraying myself with some ice water and frozen dirt clods.  I'll dig it deeper later.

Elsewhere, the snow stuck longest on top of the plastic in section 14, and within that, it stuck longest on the west where the soil is somewhat hilled and the plastic has the least ground contact.  But it still melted.  In one spot I could see the soil (expansive clay, after all) cracking slightly as it thaws and dries.  The rest of the yard, garden, driveway, etc, is pretty sloppy. 

As I walked around, I checked section 6, which is planted with daffodils.  If I want the early market, I should spread plastic over that area too.

Tuesday, February 21, 2012

Bare soil is in agony

That's what they say.

Previously, from February 7th, I posted a picture of the frozen soil height outside the mini-tunnel compared with the thawed soil inside the tunnel.  Here it is again.  You can see there's a 3" to 4" difference.
One thing I didn't mention at the time was that if protected, the soil won't subside back to it's original position.  You get frost tillage loosening the soil down to frost depth.  Now normally, bare soil is beaten back down and compacted by rain.  If it's protected though, it stays fluffier.  At least that's the theory. It's usually used as an argument for more mulch, but plastic seems to help a lot too. 

I'm trying not to do mechanical tillage, because that will destroy the soil structure and allow more compaction, even though it initially fluffs up the soil.  I do some hand tillage with a spading fork or a broadfork or other, shallower tools to discourage weeds.  Currently my biggest weed concern is rhizome grass, and I have to dig down a few inches to get it.

After I moved that mini-tunnel to a new spot, I checked the soil in it periodically. Today, that soil seemed thawed, so I moved the mini-tunnel and had a look.
The soil inside is a little lower than the surrounding frozen ground around it.  It was mostly thawed.  The chickens helped.  They didn't find many worms though.
It looks like there's a buried frost layer about 2" thick.  It's between 5" and 7" down.  The worms are below that.  My fork went through it though, and turned it up.  I'm assuming that means that throughout the garden, the frost extends down about 7"-8", so it shouldn't take too long to melt.  I might as well get to work melting it.

I pulled out one of my recently scavenged pieces of plastic.  It's 28' wide and forty-something feet long, which seems just about right for that particular spot.  Then I had to look around and find as many heavy things as I could to weight down the edges.  I should probably find more.  If the wind gets under a side, this will be up against a fence or off in the woods somewhere.

I don't like mulch plastics, because they're single use and then they're trash, but clear plastic on bare soil is one of the fastest ways to heat soil up and it's easy to re-use.  Once the soil is warm, I prefer an organic mulch, because it adds carbon to the soil which I need anyway.

This is spread in section 14 of this garden diagram:
The forecast is sunny today, then a stretch of cloudy/showery, then a mix of cold sunny and warm cloudy days next week.  By the end of that, this soil should be thawed.  (I should develop a plan for what to do then!) Section 14 is one of the most sloped areas within the garden, draining SSE.  The plastic will shed rain and melt into the raspberries in section 15.  The south edge of sections 13 and 12 has a ditch that will carry water off to the northeast corner of section 16 (hen house yard).

Section 14 is also the spot where I was digging gently with a shovel tip, turning over sprouting weeds last spring when my back seized up.  I tried foolish things to loosen it up and ripped something instead.  My back seized up again last week, but this time I've been gentler on it and it's just about back to normal.  I must change normal.  I must do core strength exercises so that this does not happen.

Meanwhile, the mini-tunnel is showing some wear.  Wind has flipped it and transported it 40' across the garden at least once.  the plastic is ripped as it rubs along the top of one end arch, and is coming loose along the bottom on one side.  But I've put it in a fresh spot in section 4, to thaw a little more soil near the other two places it's been.


 In the background right you can see my poor worn out garden art windmill.  It has a simple 5' flat blade set, and it's mounted on a bicycle bottom bracket.  That bottom bracket is upside down in the weather and it seems to take a year to wear one out in this use.  The blades are largely made of luan plywood scraps, and one of them is broken.  I really like to see it turning though.

Monday, February 20, 2012

Greenhouse updates

By all rights, things should be going in the greenhouse, and yet....

I caught a mouse in there the other day.   I saw the lettuce sprout and then disappear, so I set three traps.  I like the Ortho Home-Defender plastic snap traps.  They work much better than wooden snap traps.  But I actually caught the mouse by bludgeoning it with a rake.  They've been ignoring the peanut butter.  I must do more to make the cold-frames mouse resistant.

The spinach looks okay, but isn't growing terribly fast.
 The arugula is looking damaged. It can't be cold, so it must be getting too hot in there if I don't open the cold frame.
 The garlic that seemed less likely to keep, and was therefore thrown in a cold frame and lightly buried, is sprouting nicely.  This cold frame has a piece of lumber wrap tarp over it to moderate the temperature and reduce light levels, with the idea of slowing sprouting.  Hopefully it will grow slowly enough that I'll be able to transplant it out in a month.
The garlic stored in the root cellar pit is keeping okay, but sprouting some.  This is not a surprise, because a chill period (which it had) stimulates sprouting.  The stuff in the blue tub is sprouting most.
 The well developed scape flowers are sprouting least.
 The rest is somewhere in between.

The potatoes in the barrel were a different story.  Somewhere along the way it had flooded.  It smelled a little funky too.
 Behind the potato barrel, I noticed a pile of soil that looked like it had been washed in.
 To empty the barrel, I did something I'd been meaning to do for a while.  I built a simple pump.  This is two check valves, a T, some scraps of 1 1/2" pipe, and a piston made from a scrap of plastic 1" conduit with a flared end.  Heating the flared section made it shrink, giving enough clearance so it will slide easily.  It doesn't seal well, but for the moment, it works.  I used successively smaller pieces of black poly water line as the intake, sealing them with electrical tape.  I'd like to work this up and get it smooth enough to attach to a small windmill eventually.

That made it possible to get enough water out of the barrel that I could pull out the potatoes, black plastic contractor bag and all.

 Spreading them out, they seem like the tips are damaged by submersion, but the tubers as a whole are okay. 

That blue bucket of garlic was on it's side a few days back.  I bet it was tipped over in the same flood and may be sprouting more because it has some water in the bottom.

Fences.

Fences are for basically two things:  protecting animals from other animals, and protecting plants from animals.  For most of the last ten years I've kept animals of one sort or another.  We had ducks that were allowed to run amok during the day and got shut up at night, and we had sheep.  I suppose keeping the sheep from wandering in the road might be considered a third purpose.  Anyway, now we just have chickens.  Right now, the chickens have the run of the garden during the day and get closed up in the hen house at night.  During the summer that's going to have to change, because they'll destroy the garden, given a chance.  Properly channeled, that can be a useful thing, but not in areas where I'm actively trying to grow things.

I think I mentioned the initial tillage of the garden.  After that, I drove 8' posts about every 10' around the garden, and put up two layers of old wire sheep fencing, one over the other.  I tied the top of the lower and the bottom of the upper together, so it's more or less a solid woven wire fence 8' tall.  Because the 8' posts are driven in about 18", the top 18" of the fence is unsupported.  The idea was that deer would be the major pest to keep out.

I drove them in mostly with the homemade driver that the previous owner left behind.  Getting an 8' post started and driven and then pulling this thing off the top was sometimes tricky.  I once managed to drop it on my head when pulling it off a newly driven post.  I fell on the ground yelling and had to feel my skull to make sure it was still solid.  Luckily, my bones are very resistant to breakage.  Mental Note: Hard hats are a good idea when lifting this thing overhead.


We had already put up the early hoop house tunnel, and it became part of the fence.  The gate went right next to it, with the hoop house end acting as a gate post.  The gate is just a loose section of fence with a 2x4 put in the end vertically.  There's a hook in that 2x4 that attaches to the old hoop house end wall to close the gate.  This type of flexible gate is easy to put together, but over time the wires work back and forth and break.  So now, I also have two old cot size flat springs (marked USN on the side) that act as the gate.  The chickens are content to stay inside as long as they're closed.  I can slide or lift them out of the way to get the garden cart in and out.  I'd like to make a decent gate frame and use the flat springs as door-gates eventually.  Sometimes I think about cutting a foot gate opening into the fence somewhere along the north side too, to make it easy to go in and out without having to backtrack to the middle of the west side.

I didn't reinforce the corners when I put the fence up, and now they sag inward.  Porcupines have an easy time finding a way through sheep fence, and have turned out to be one of the most significant mammalian problems in the garden.  (There are rats around the hen house too, but fences won't solve that issue.)  At one point a new generation of poorly socialized ducks decided to leave and walked right out through the fence.  Clearly it wasn't good enough.

So I've been reinforcing it somewhat haphazardly with bits of fence and pallets and plywood from the transfer station.  There are still a couple places where it needs more, but I think I've got it mostly tight for the time being.  It just looks like hell.  There are now essentially two fences:  There's the original sheep fence to keep out deer, and there's the new cobbled layer outside that, about 4' tall, to keep out porcupines and keep in chickens.

The northeast corner has plywood and a pallet reinforcing it.  The east side has some 2"x4" welded wire down low, held to the old fence with the legs of old mattress platform frames.

The 2" Irrigation lines snakes through the fence half way along the east side.  All that grass grown up among the fence wire may look messy, but if I see a gap in the grass I know something is going through a hole.

 The southeast corner has a big piece of plywood and a large pallet to reinforce it.  There are a few bits of pipe driven in to hole these up.  I need to adjust things though because there's a porcupine width gap between the two, right in the corner.  It'd also be nice to pull that old corner fence post back to the new pipe post in the corner, just to straighten things up.

 The south side is a mix of pallets and old plywood from the demolition pile at the transfer station.  At each old fence post, a bit of angle iron from a mattress platform frame is driven in on the outside of the new layer, and the top is wired through the fence to the old fencepost.   Here and there there's a diagonal brace propped up.  This area outside the fence has asparagus planted, but really lousy weed control.
 The southwest corner is big pallets, with pipe driven into the ground.  I just moved some of these around.  There's one type of pallet that's 10' long and makes a very nice fence section.  They come from Viking Lumber's burn pile.  They originally had boxes of drip edge shipped on them.  As you round the corner, the old hoop house frame ends are standing, and the wood fence between them is made of these, with a few extra square pallets leaned up to brace things here and there.  There's also an old propane water heater and an empty propane tank from when we tried to heat water under a sand bed to get things started early in that hoophouse.  I really should clean that up.

 This box is made with 4x4 plywood and pallets, and is lined with old greenhouse plastic.  The whole thing should probably go, but at one time (before the plastic sprung a leek) this was a cistern to dip water out of when I needed to can water a newly seeded bed.  It had goldfish in it for several years too.  They'd survive the winter under the ice in the tank and eat mosquito larvae in the summer.   I'll pull this down, but I'll replace it with another much like it.  Behind it and to the right you can see one of the cot flat springs that acts as the current gate.

There have been other fences too.  When we bit off more than we could chew and tried to expand into a 2 acre garden to the east and northeast of this one, we surrounded it with a 3D deer fence.  There was one conductor about 30" up on one set of fiberglass rod posts, and then a second set holding two more conductors 3' to the inside of that first line.  One of those conductors was 48" up, and the other was 8" off the ground.  The idea was that deer don't like to jump distance, and the low conductor keeps them from crawling under.

It didn't stop porcupines though.  When I found a few dozen lettuces nibbled and a single porcupine quill among the damage, I put up yet another electric fence, 6" tall, all around that tempting target.


And the sheep were in electronet sheep fence, which is nice because it's so easy to move, but eventually they learned to jump it or push it over, and after 10 years a lot of it needed to be replaced, so I sold half the flock and put the other half in the freezer.

There are a couple of sections of poultrynet in the garden, which I used last summer to keep the chickens out of the growing areas.  I don't like the way weeds grow up through plastic net fences left the whole summer, and it wasn't electrified anyway.  I'm going to look for an alternative for next summer.

Wednesday, February 8, 2012

Garden Carts


I am blessed to have three garden carts.  One I sort of inherited, and the other two came from the transfer station.  It's amazing what people throw away.  There's a hole in the first ply of the plywood deck, that's going to have to be addressed eventually.

The one I sort of inherited belonged to the grandfather of a friend.  It was old when I got my hands on it, and I proceeded to wear it out.  I hauled firewood out of the woods with it, hauled compost and rocks in it, used it on rough terrain, bent the wheels, failed to oil the bearings,  and watched as the bottom of one skid rusted away over time until it was two pieces instead of one.

Then I got a second one at the transfer station.  The bottom was "reinforced" with OSB, which had taken on enough water that the thing felt full when empty.  It too had a bad skid, and the front was nothing special either.  The axle and wheels were okay though.  I got a sheet of (non-CCA) pressure treated 1/2" plywood and replaced the bottom.  I used a scrap of rough cedar board as a new leg.  The leg brace under the cart bolts to the board easily.  The front is new plywood too.  What I had on hand for materials for that wasn't the full height of the original, but it comes up even with the sides.  So then I had two carts.

Not long after that, I found a cart axle with good wheels at the transfer station, without it's cart.  That went on cart #1, along with another wooden leg.  So then I had two functioning carts.  The original conduit clamps that held the axle on were bolted into T-nuts, which were uncooperative, so I made some wooden blocks with 3/4" cut outs, fit them to the cart and axle, and screwed through the cart bottom from the top, into the blocks below.  Works great.

Eventually I found cart #3, which is a slightly different style.  The front is designed to swing open to dump it's load forward, and it has a bar over the top of the front for it to pivot on.  It even came with a back wall for the box, but I see no reason to bother with that.  I found that the front came open too easily, so I bolted it at the latch and added two angle brackets to hold it shut.  Otherwise, all it needed was axle grease and air in the tires and it was ready to go.


I have a wheelbarrow.  The tire is flat just now.  It's tubeless, which means it's impossible to get it pumped back up without endless fiddling with the tire, wrapping a belt around it, trying to get the bead to seal.  The wheel is wider than a cart wheel, but it's smaller diameter, so it gets stuck just as easily. 

Cart #2 has a flat tire right now too.  There's also a spot where the rim edge is bent out.  But I can hammer that back in easily enough, replace the tire (which needs it) and the inner tube with bike tires and tubes, which I can get free at the transfer station from bikes people have thrown away.

A wheelbarrow's balance while hauling isn't as good as a cart either, so the cart can carry a bigger load with less effort.  The one advantage I can think of for the wheelbarrow is that it can go down a narrower path.  There are times I think about lining up planks over rough surfaces to run the wheelbarrow on.  You can't do that with a cart so easily.  But the cart will straddle a garden bed at the width I set them up, allowing it to balance without needing a very wide path, and a cart isn't going to tip over in soft soil with an uneven load like a wheelbarrow will.

All three of mine are original Garden Way carts. 

I bought a cheap knock-off from Harbor Freight.  The body was 3/8" plywood, and not exterior grade, so it soon fell apart.  Because the metal edges are sized to wrap around the ply, I can't replace the old wood with decent thickness new pressure treated.  And the tires sun-rotted in an amazingly short period.  At least I have a spare axle and wheels from it.

I see some designs on line for home-built carts.  Maybe eventually I'll find it easier to build one of them than keep repairing the ones I have.  I sort of doubt it though.

Typically, they don't get lined up together much.  Usually one is somewhere near the drying woodshed, one is near the garden, and the third could be anywhere, possibly being used to move junk around.  If I have the option, I try to lean them up against something so the bottom is upside down at a 45° angle and sheds rain.  I used to keep them in the carport next to the garage, which came to be called the cart-port, but there's a boat in there now.


Tuesday, February 7, 2012

The Joy of Dead Crabs.

It's good to make use of local resources.  There's a local garden writer who discussed how he gets crab waste from a crab picking shop for his garden.  It seemed like a good idea so I went around to a few crab shops and asked if they had picked out bodies to get rid of.  They looked at me and said, "Do you know a guy named (insert garden writer's name here)?"

Let me back up.  That crab meat you get in the grocery store doesn't just fall out of the shell.  There's no machine to pull it out either.  There are people who hand pick the meat from the crabs.  They buy the live crabs from fishermen, usually lobstermen who catch them when the lobsters are elsewhere.  They steam them to kill and cook them, then they bring the crabs into a clean room where a row of pickers slowly disassemble them.  They pull off the legs one by one and scoop out the meat with various small picks and other tools.  All the waste, which is a significant portion of the crab, goes into a bucket, to be emptied into a trash can provided by me.

I got the 'contract' when said writer called me up one day.  I'd run into him in the Co-op, and asked him where he didn't get crab shell.  A month or two later he called me up and said he had more than he could use, and made introductions for me at that shop.  The deal is, I supply the barrels and take them away when they're full.  I get the resource, and the crab shop gets it hauled away free.


I've tried to spread the wealth some.  I've given some to neighbors, several of whom are homesteader/small farmer types.  There was that time I gave some (only two barrels) to some folks who weren't so familiar with the concept.  I dropped them off, and two days later got a call.  "Dan, come take them back, PLEASE!  They're, uh, surrounded by crawling things."  So the next morning I picked them up when it was cool and dumped them in my back yard under my favorite apple tree.  The crawlies were gone by noon.

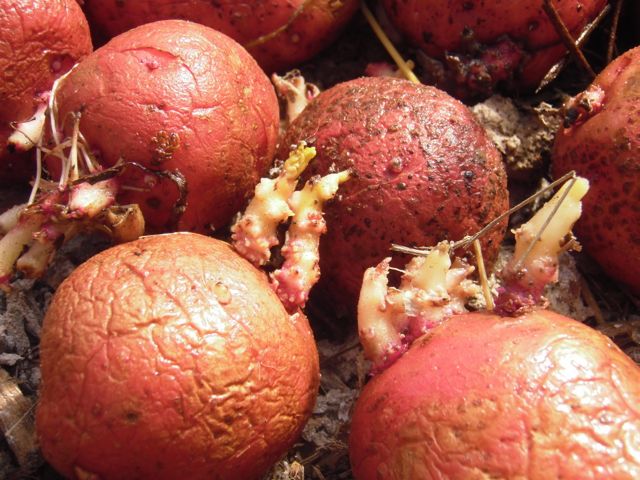
Yes, they reek.  Right now they're not so bad, because it's early February (feels like early March) and there are no flies active.  But in May and beyond, the flies come and when I pull open the lid, it's a wriggling mass of maggots.  And there's the "juice" that drips down to the bottom of the barrel that works as a good liquid fertilizer concentrate if you can bear it.  Another friend of mine who's a former Paramedic, used to blood and gore and all that, had to step back a good long way.

That's the down side.  The up side is that it's free fertility.  It's said to be 23% calcium in the shells, and 60% protein.  60% protein means that 10% of the whole dry weight is nitrogen.  I imagine there's a little phosphate in there too, but much less, proportionately.  Now nitrogen and calcium are generally soluble, so this should keep things topped up on that side.  Phosphate and potash aren't so soluble, and I've added enough wood chips, stable cleanings, etc, that I should have acceptable levels of those.  I should probably get a soil test some time to check all these things.

Up until early last fall I had a 2000 Toyota Tacoma, but they took it away because of frame rust.  I liked that truck, but nobody makes a 4 cylinder, 5 speed, 2wd, extra-cab truck any more.  I ended up getting a beat up Subaru wagon and building this trailer to replace the truck.  With the truck, I had a 26" tail gate height, and I could put three, then two, then two, then three 32 gallon plastic trash cans in the bed and slam the tail gate.  Sometimes I'd put three more on the tail gate and tie them on.   With the trailer, I have to think more about weight and balance.  The springs, axle, and tires are rated at 1000#, and the trailer hitch is rated for 300# tongue weight.  The axle is a little behind the center of the bed, so it balances at 6 cans forward of the axle and 4 cans aft.  I hate to think of what these 8" wheels look like when they hit a pothole or frost heave, but they haul the load.


The lights are flat LED truck lights, protected within angle iron C-channels.  I've had enough of the other sort of trailer lights that always get broken on something.  The floor boards are spaced so that dirt and crud can sift through.  The sides are 16" tall plywood, which is enough to hold the barrels fairly well.  The bed is 96" long and 40" wide, so a 4x8 sheet will fit in on the diagonal, and the barrels fit in easily, two abreast, without much space to rattle around side to side.  I've thought about a slightly wider axle and 12" tires, but why overwhelm the car by increasing the trailer capacity?

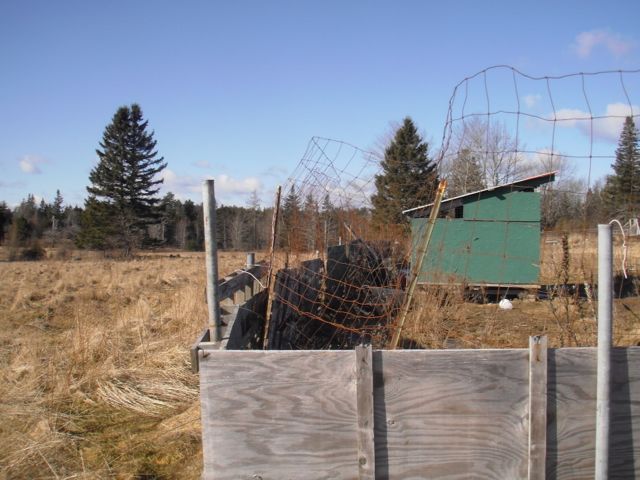
You can see the rope across the tail gate.  The tail gate is just tied in place and comes off easily for loading.  It actually makes for easier loading than when I had the truck, because the trailer deck is so low.  It's very close to the height of the bed in a garden cart, so I get the cart close and walk the barrel from trailer to cart fairly easily.  I can get three barrels in a cart, but sometimes two is a better idea.  I dump them in rows, more or less, in the garden, and then my "crew" comes and rakes them out over the course of several days.


This particular patch is in the northwest quarter of the garden.  It got a lot of wood chips last year, but still went to weeds after I hurt my back.  Chickens digging will help keep weeds under control, and giving them some incentive to dig and scratch doesn't hurt.

The one other drawback of spreading the shells at this time of year is that anything not bound up in the shell can wash away quickly.  I regret this, but there's 300' of field between where I dumped them and the pond.  Hopefully the runoff will be filtered by the soil organisms and I won't be losing those nutrients.  I do sometimes think of the Chinese compost houses in Farmers of Forty Centuries, and how I could compost the shells with waste hay, wood chips, and seaweed before spreading it on the garden.  Maybe someday.

The other option is to till them in.  One year I did an accidental experiment where I surface spread in one area and tilled the crabs in in another.  Tilling in is clearly the better way to go.  But right now the soil is frozen, the tiller is broken, and I haven't figured that into my management scheme.

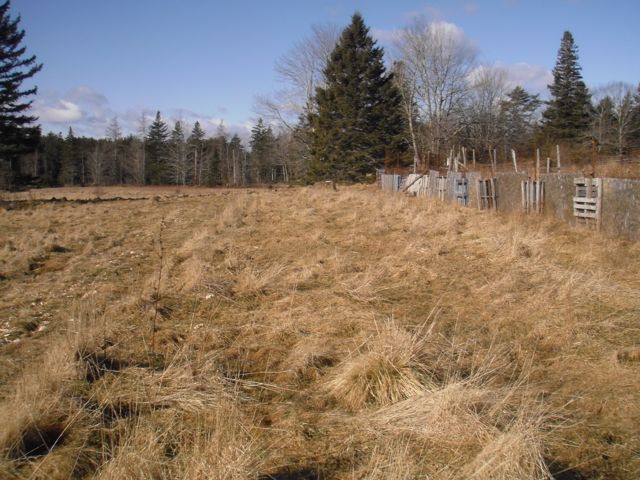
While I was out there I noticed a few things about the 6' x 12' mini-tunnel.  I noticed that the soil outside (frozen) was several inches taller than the soil inside.  Once I moved the mini-tunnel, I put the garden cart astride where the north edge had been to make the difference clearer.


That's how much frost expands this soil. 

I also noticed how things were going inside the mini-tunnel.  Grass was sprouting and the soil wasn't frozen.   The chickens like this.  In this picture, you can just see the old bits of crab shell and wood chips remaining in the soil from previous applications.

This means that if I spread plastic over areas of the garden, it should be thawed pretty soon.  It means I should go after that one thawed area with a spading fork to amuse the chickens and discourage the grass.  And it means that I could be making better use of that mini-tunnel, even if it is an awkward size, not big enough to move around in comfortably and too big to lift easily.